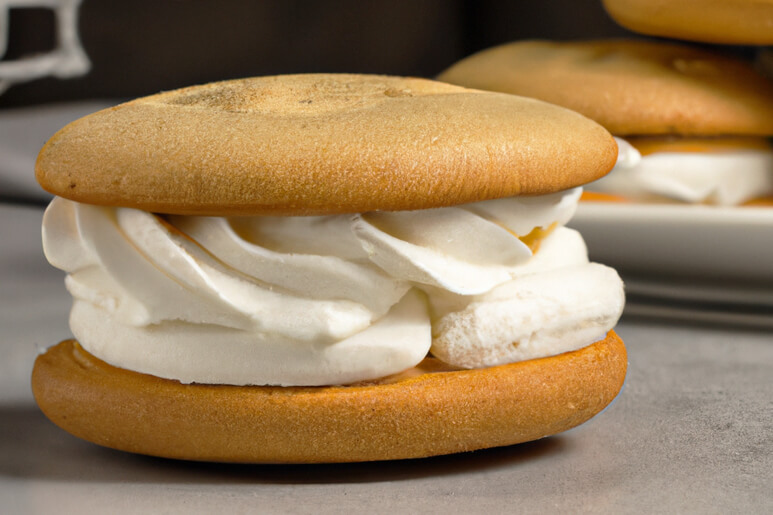
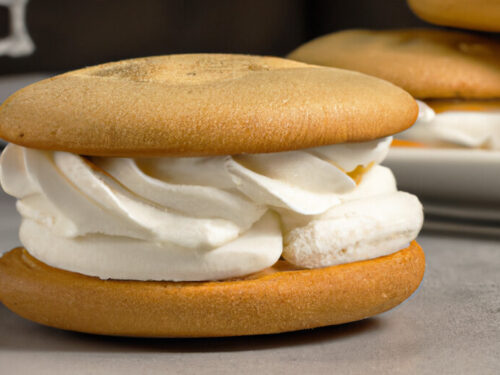
Have you ever heard of a vanilla whoopie pie? If not, you’re in for a treat! This Vanilla whoopie pie recipe is sure to become a go-to dessert in your recipe collection. This classic American dessert is a great way to satisfy your sweet tooth and bring a smile to your face. It’s a classic treat that has been around for decades and is loved by people of all ages.
These classic treats are a perfect combination of soft, fluffy cake and creamy, lightly-sweetened filling. Whether you’re serving it for breakfast, dessert, from a birthday party to a cozy night in, or just as a snack, the Vanilla whoopie pie recipe is sure to be a crowd-pleaser.
How to Make Perfect Vanilla Whoopie Pies at Home
This Vanilla whoopie pie recipe requires only a few basic ingredients and a few simple steps to get the perfect whoopie pie every time. Plus, it’s surprisingly simple to make. Whether you’re a novice baker or an expert, this Vanilla whoopie pie recipe is sure to be a hit.
So why not indulge in a delicious and satisfying treat with this Vanilla whoopie pie recipe today? Get ready to wow your family with this delicious homemade treat!
Ingredients:
For Cakes:
- All-purpose flour — 2 cups
- Granulated sugar — 1 cup
- Unsalted butter — ½ cup
- Milk — ¾ cup
- Vanilla — 2 teaspoons
- Baking soda — 1 teaspoon
- Salt — ½ teaspoon
- Egg — 1
For Filling:
- Marshmallow cream — 2 cups
- Powdered sugar — 1 cup
- Unsalted butter — ¾ cup
- Vanilla — 1 teaspoon
- Salt — ¼ teaspoon
- Vanilla bean paste — ¼ teaspoon
Vanilla Whoopie Pie Recipe – Step by Step Instructions
For Cakes:
Step 1:
Begin by preheating your oven to 350 degrees Fahrenheit and positioning the two oven racks, one in the upper middle and one in the lower middle position. Next, line two baking sheets with parchment paper to prepare for baking.
Step 2:
Using a stand mixer set to medium speed, beat the butter and sugar together until they become light and fluffy. This should take approximately 5 minutes.
Step 3:
Next, add the egg and vanilla to the mixture, and continue to beat until well incorporated. Remember to scrape down the sides of the bowl to ensure all ingredients are evenly mixed.
Step 4:
In a large bowl, combine the baking soda, flour, and salt. Then, reduce the mixer speed to low. Gradually add the dry ingredients to the butter mixture, adding 1/2 cup at a time and alternating with the milk. Be sure to begin and end with the flour to ensure even mixing.
Step 5:
Using a 1/4 cup measuring cup, scoop the batter onto baking sheets, leaving a 2-inch space between each cake. This should yield 12 cakes. If you prefer smaller cakes, use a 2-tablespoon measuring spoon and prepare an additional baking sheet.
Step 6:
Bake the cakes at 350 degrees Fahrenheit for 15 to 18 minutes, making sure to switch the baking sheets halfway through for even baking. If you are making smaller cakes, reduce the baking time to 10 to 12 minutes.
Step 7:
To check if the cakes are fully baked, insert a cake tester into the center of one cake; if it comes out clean, they are ready. Keep in mind that the cakes will still be soft. Remove the cakes from the oven and transfer them to a cooling rack to cool completely.
For Filling:
Step 1:
Using a stand mixer set to medium speed, beat the butter and powdered sugar together until light and fluffy. Then, add the vanilla and salt, followed by the marshmallow cream, and continue to beat until fully combined. Finally, add the vanilla bean paste and stir it in to complete the mixture.
Step 2:
Take half of the cakes and spread 1/3 cup of filling onto the flat side of each one. Make sure the filling is spreadable but not too runny.
Step 3:
Note: If the filling is sliding off the cake, place it in the refrigerator to firm up or add more powdered sugar. If the filling is too thick to spread, add a small amount of milk to thin it out.
Step 4:
Place the remaining cakes onto the filling to create a sandwich.
Step 5:
The cakes can be served immediately or refrigerated until ready to serve.
Why is It Called a Whoopie Pie?
The origin of the whoopie pie is a bit of a mystery. Some say it originated in Pennsylvania Dutch Country, while others believe it was first made in Maine. No matter where it came from, the name is a fun one.
So the next time you’re wondering why it’s called a whoopie pie, just remember the phrase “whoopee!” It’s a dessert that brings people a sense of joy and excitement, just like the phrase implies.
Vanilla whoopie pie recipe are a fun and delicious treat that will always be a favorite no matter why it’s called a whoopie pie.
FAQs
What is The Difference Between a Whoopie Pie And a Gob?
The primary difference between a whoopie pie and a gob is the type of cake used to make each. A whoopie pie is made with a soft, cake-like cookie and filled with a creamy frosting or filling, while a gob is made with a slightly denser cake that is usually spiced and filled with a fruit jam.
Why Do Whoopie Pies Get Sticky?
Whoopie pies are usually filled with a creamy, buttery filling that contains sugar and butter. When the sugar and butter mix together, they create a sticky consistency, which can cause the whoopie pies to become sticky over time.
How Long Do Homemade Whoopie Pies Last?
If stored at room temperature, they can last for about 3-4 days, depending on the type of filling and the ingredients used. If stored in the freezer, they can last up to 2 months.
Vanilla Whoopie Pie Recipe
Ingredients
For Cakes:
- All-purpose flour 2 cups
- Granulated sugar 1 cup
- Unsalted butter ½ cup
- Milk ¾ cup
- Vanilla 2 teaspoons
- Baking soda 1 teaspoon
- Salt ½ teaspoon
- Egg 1
For Filling:
- Marshmallow cream 2 cups
- Powdered sugar 1 cup
- Unsalted butter ¾ cup
- Vanilla 1 teaspoon
- Salt ¼ teaspoon
- Vanilla bean paste ¼ teaspoon
Instructions
For Cakes:
- Begin by preheating your oven to 350 degrees Fahrenheit and positioning the two oven racks, one in the upper middle and one in the lower middle position. Next, line two baking sheets with parchment paper to prepare for baking.
- Using a stand mixer set to medium speed, beat the butter and sugar together until they become light and fluffy. This should take approximately 5 minutes.
- Next, add the egg and vanilla to the mixture, and continue to beat until well incorporated. Remember to scrape down the sides of the bowl to ensure all ingredients are evenly mixed.
- In a large bowl, combine the baking soda, flour, and salt. Then, reduce the mixer speed to low. Gradually add the dry ingredients to the butter mixture, adding 1/2 cup at a time and alternating with the milk. Be sure to begin and end with the flour to ensure even mixing.
- Using a 1/4 cup measuring cup, scoop the batter onto baking sheets, leaving a 2-inch space between each cake. This should yield 12 cakes. If you prefer smaller cakes, use a 2-tablespoon measuring spoon and prepare an additional baking sheet.
- Bake the cakes at 350 degrees Fahrenheit for 15 to 18 minutes, making sure to switch the baking sheets halfway through for even baking. If you are making smaller cakes, reduce the baking time to 10 to 12 minutes.
- To check if the cakes are fully baked, insert a cake tester into the center of one cake; if it comes out clean, they are ready. Keep in mind that the cakes will still be soft. Remove the cakes from the oven and transfer them to a cooling rack to cool completely.
For Filling:
- Using a stand mixer set to medium speed, beat the butter and powdered sugar together until light and fluffy. Then, add the vanilla and salt, followed by the marshmallow cream, and continue to beat until fully combined. Finally, add the vanilla bean paste and stir it in to complete the mixture.
- Take half of the cakes and spread 1/3 cup of filling onto the flat side of each one. Make sure the filling is spreadable but not too runny.
- Note: If the filling is sliding off the cake, place it in the refrigerator to firm up or add more powdered sugar. If the filling is too thick to spread, add a small amount of milk to thin it out.
- Place the remaining cakes onto the filling to create a sandwich.
- The cakes can be served immediately or refrigerated until ready to serve.
